Showing posts with label caramel. Show all posts

10/19/10

TWD: Caramel Pumpkin Pie


Just like most food bloggers in Fall, I have the pumpkin bug. I tried to tell myself that I'd hold off until the weather felt more like Fall, but let's face it, in New Orleans that might not happen until late November! So I was delighted when I saw that Janell of Mortensen Family Memoirs had chosen Caramel Pumpkin Pie for this week's Tuesdays with Dorie recipe! Of course, when I went to the store to buy the pumpkin puree I had to pick up a few extra cans and even though I didn't snap any pictures I ended up making these delicious Pumpkin Scones from Bridget of The Way the Cookie Crumbles (they are easy to make and amazing, please make them soon) for Eloise's baptism brunch last week:

That's my mom doing the baptism! She's an Episcopal priest which works out nicely because Eloise didn't wiggle around or fuss for her "GiGi" while she poured the water on her head the way many babies do!

Then when I woke up on Saturday morning at 4:30 am with my little early-risers I decided to make this Pumpkin Bread from AllRecipes- I have tried a few other pumpkin bread recipes but this one really is the best, very moist and very spicy.


Anyway, onto the pie! I really like pumpkin pie, but it's never been a family favorite for Thanksgiving: my dad likes it, my Uncle Bobby likes it, and that's about it. So I've made a plain old back of the can Libby's Pumpkin Pie for Thanksgiving once or twice but it never gets eaten the way that pecan, apple, and cranberry pie do. I was excited to try a different pumpkin pie recipe, especially because Dorie describes the pie as a more sophisticated and unusual pumpkin pie because of the very dark (almost black) caramel that is mixed into the usual pumpkin pie components. I really liked this pie, and so did Eloise, but Helen and Derrick didn't even touch it, so we ended up with quite a bit that didn't get eaten. The pie is still pumpkin-y but it has that smokey, sweet-bitter burnt sugar flavor too. Two things that surprised me about this pie were that 1) the caramel does not taste very sweet on it's own so I was concerned that the pie would be very bitter, but the pie itself has a wonderful flavor- no need to worry! 2) Dorie says that the pie shouldn't jiggle at all and that a knife will come out clean when the pie is done. My pie took about 7 extra minutes to bake and then I went ahead and pulled it out even though it still jiggled and the knife was not completely clean and the consistency of the pie was perfect once it had time to cool.

The thing that impressed me most about this pie was how crisp and flaky my crust stayed! Even with a partially baked crust, I've never really been able to keep the crust on my pumpkin pies from getting soft- but Dorie's Good For Almost Anything Pie Crust did the trick! I would definitely make this again and I'm going to try the almond streusel topping from the playing around section!

3/23/10

TWD: Dulce de Leche Duos


Dulce de Leche is one of those things like soba noodles or cocoa nibs that I feel like I know about but then when I step back and actually think about (or have to use it in a recipe) I can't actually pinpoint a time that I've eaten it. But the funny thing is, that I have eaten dulce de leche multiple times- I just didn't know it. You see when this week's Tuesdays with Dorie recipe for Dulce de Leche Duos was selected by Jodie of Beansy Loves Cake the P&Q quickly filled with links to recipes to make your own dulce de leche (even though Dorie says to use store bought). When I clicked on the recipe from David Lebovitz I realized that pouring a can of sweetened condensed milk in a covered pie plate in water bath and baking it for two hours constitutes dulce de leche. Wait a minute, that's what my Aunt Dottie has been doing for years! She pours the cooked condensed milk in a pre-baked tart crust and tops it with unsweetened, freshly whipped cream and calls it Caramel Pie. It's an old family favorite. We're a really chic family, we're up on the new food trends. So, hey, I love dulce de leche! and even though it sounds fancy and gourmet it's really easy and cheap to make at home!


I was worried that the cookies would be cakey and soft (not my favorite cookie texture) but they were crisp on the outside and chewy on the inside. The cookies themselves have dulce de leche in them and then are sandwiched between another thin layer of dulce de leche- who could ask for anything more? The one complaint I had was that they keep well before being sandwiched together but once the dulce de leche is in between them the cookies soften a bit so it's best to leave them apart until you are ready to serve or eat them.

1/12/10

Happy 2 year (and 1 week) Birthday TWD!


Surprise, surprise, I'm late with my Tuesdays with Dorie post! This should have appeared last Tuesday, when the Tuesdays with Dorie baking group was celebrating it's 2nd birthday...but things kept turning up and while I was able to bake on schedule I couldn't figure out how to get the pictures off my new camera and onto my computer.

Because this was TWD's 2nd birthday, our fearless leader, Laurie, of Slush decided to let us bake two treats this week! The first selection is Cocoa Buttermilk Cake, which as you can see I turned into cupcakes. These were truly delicious, they were incredibly moist and the cocoa flavor was really delicate and wonderful. I actually made my own buttermilk by adding a tablespoon of lemon juice to one cup of regular milk and it worked perfectly (although I imagine real buttermilk would have yielded even better results). The recipe calls for a chocolate frosting with malt powder and I would actually love to try it out sometime but I was unable to get my hands on it this week so I stole Tracey of Tracey's Culinary Adventure's idea of topping the cupcakes with peanut butter frosting. Wow! it that is a recipe that I will use all of the time now- so easy and such perfect flavor and consistency. I brought these to my dear friend Sadiha for her 25th birthday and they were a big hit! I'm thinking about making this as an actual cake for Helen's upcoming 2nd birthday.


The second selection was a traditional French Tarte Tatin or upside down apple tart. You melt a stick of butter and 3/4 cup sugar in a cast iron skillet on the stove and then place peeled, quartered pieces of apple in the pan and let it caramelize before laying the pie dough over the top of the apples and baking it in the oven. My apples took a good 20 minutes to caramelize but I really wanted to make sure that I achieved a nice deep amber color. Dorie says that you can use puff pastry, sweet tart dough, or good for anything pie dough and I decided on the good for anything pie dough. The last time I made Dorie's good for anything pie dough I was a little disapointed with the results, but this time I used a pastry cutter instead of the food processor and the crust was amazing. It puffed up with all kinds of buttery layers almost like puff pastry! The hardest part, of course, was flipping the tart out of the skillet but I did it quickly and only lost a tiny corner! This was by far one of my favorite recipes to date! I shared the tart with my parents, brother, sister, Derrick, and Helen and it disappeared very quickly! If I had left it at home I think I would have eaten the entire thing instead of the one slice I allowed myself (in keeping with Ten in 10!)


So thank you Laurie, and thank you Dorie, and of course thanks to all of the other TWD bakers who make baking through Baking From My Home to Yours so much fun!

11/17/09

TWD: Chocolate Caramel Chestnut Cake


My mom always said that the difference between guilt and shame is that guilt is an important tool in effecting positive change while shame halts positive growth. She has a PhD in psychology so we got to hear a ton of smart little tidbits like this as we grew up. I'll be honest with you, I didn't really understand or believe the guilt/shame thing until pretty recently. You see I'm one of those people who feels guilty about pretty much everything- I have to conciously force myself to not feel guilty all the time. It actually used to be much worse when I was little. I think I owe most of my early guilt to Catholic grammar school (thank God, yes really God, that my parents pulled me out in fourth grade and switched me into a far more relaxed and forgiving learning environment). When I was little I used to sit around wondering if I may have had an unkind thought about someone without really realizing it and if I'd better do some penance just in case. Yeah, that kind of guilt. Then when I got older I started feeling guilt about things like not being the smartest, the thinest, the most outgoing, etc. It wasn't a "I want to be the best" thing, seriously, it wasn't and it still isn't, it is seriously a guilt bordering on shame thing.

Anyway, I grew up and out of a lot of these feelings. So I never really saw how guilt could be a good thing- all it had ever done for me was hinder my ability to accept myself. But the other day a parenting moment changed all of that. I'll set the scene for you: I'm doing dishes in the kitchen with Eloise sitting patiently in her bouncy seat, Derrick is grading papers in the living room, and Helen is running back and forth evidentily trying to get either one of our attentions. Somehow Helen decided that the only way I would stop cleaning the kitchen and play with her was if she hit Eloise in the face with The Cat in the Hat. Poor Eloise was inconsolable- screaming at the top of her lungs and unable to catch her breath. In reality, she wasn't hurt badly, but she's only ever been coddled and Helen's violence took her by surprise. At that moment, all I wanted was for Helen to feel guilt- I wanted her to see what she had done and to never, ever do it again. She actually did feel bad- she looked frightened and sorry and asked me to give Eloise some medicine. Guilt. Who'd of thought?

Ok so now cake- an earlier version of myself would have felt horribly guilty, perhaps even ashamed about the way that I mauled the extremely simple chocolate glaze that covers this lucious cake. But guess what? I don't feel guilty at all because the rest of the cake came out perfectly! The ganache sandwiched between the two layers and coating the outside of the cake is made from hot caramel poured over semi sweet chocolate...ummm how have I never thought of doing this before? Divine. The cake has sweetened chestnut puree in the batter. This was my first experience with chestnuts (besides hearing Johnny Mathis sing about them roasting on an open fire). Let me just say this- I thought the chestnut flavor was perfect in this cake, but I tried incorperating the leftover, unsweetened puree into a pumpkin soup and it was a perfect disaster. I actually did feel guilty about the soup because boy did I waste a bunch of pumpkin and cream in creating that pot o garbage. Anyway, I skipped the syrup and the chopped chestnuts (too expensive) that Dorie called for and I don't think the cake suffered from it at all. This is a wonderful cake with thoughtful, complex flavors that would be perfect for any holiday party. The cake calls for over a pound of butter and two cups of cream so if you are proned to feeling guilty about rich desserts, you might want to skip this one...

This week's Tuesdays With Dorie recipe was chosen by Katya of Second Dinner recipe can be found on her blog and in Baking From My Home to Yours by Dorie Greenspan.

9/29/09

TWD: Chocolate-Crunched Caramel Tart


I was telling my Tweetie about this tart the other day when she said, "honey, I don't know how you have the time to bake!" and it got me thinking. You see, I don't have the time to bake. I have to make the time. As cliché as it might sound, baking and cooking keep me sane. I stay at home all day long and care for my darling daughters, I clean the house, I do dozens of loads of laundry, I do all of the grocery (and other) shopping, but baking is something I can always squeeze into my schedule because I can do it any time of day, it's (mostly) inexpensive, and I don't have to leave the house to get it done. I love being in the kitchen and I love feeding people. The time I spend in the kitchen is my creative time. Oh, and of course, I love eating what I've made too!
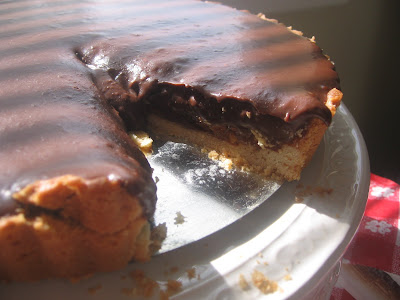
Well this tart was definitely worth my time! Carla of Chocolate Moosey chose this week's Tuesdays with Dorie recipe (recipe is on Carla's blog). I've said it before, but I'll say it again: I love Dorie's Sweet Tart Dough- I love it, I love it, I love it! The crust always turns out delicious and beautiful and it is made in the food processor! But the crust is not the greatest part of this tart. The really special part of the tart is a thin layer of soft caramel studded with honey-roasted peanuts. The caramel is very easy to make and tasted divine- I could have eaten it with a spoon. Anyway, the caramel is hidden under a thick layer of chocolate ganache. For some reason, my ganache was a little too soft- I think I might have measured out the chocolate incorrectly- but it still tasted great. Dorie says that the tart should set in the refrigerator for no longer than 30 minutes but I actually kept mine in the refrigerator and had no problems with the crust getting soggy or the caramel getting hard. I didn't really think about it at first, but this was kind of like a very dressy snickers pie. I think I'm going to bring this tart to Thanksgiving this year.

11/29/08

Daring Bakers: Caramel Cake


Sorry I'm posting this late in the day but we got back from Thanksgiving in the Tennessee mountains late last night and Helen Mae is really struggling to get back into a good nap schedule. Good thing I had foresight to make this delicious and very rich cake last week before I left for our trip!

November's Daring Bakers challenge was Caramel Cake with Browned Butter Caramel Frosting. The difficult part of the cake was making the caramel syrup which was used in the cake batter as well as the frosting. Like any caramel, you have to let sugar and water boil together until it turns a dark amber color- what made this a little different from other things I've done with caramel is that once the amber color is attained you pour one cup of water into the caramel to stop the cooking. I read a lot of comments about how much it would sputter and pop when the water was added so I used oven mitts and a long sleeved shirt and I didn't have any problems. Right after the water was added it seemed like the sugar became a little solid but I kept whisking it over medium heat and eventually it turned into a really nice syrup.


Honestly, the flavor of the syrup itself was so good that I could have eaten it by the spoonful- but it really added a delicious taste to the cake. Many of the Daring Bakers complained about the extreme sweetness of the cake and the frosting so I used regular salted butter instead of unsalted and mine turned out with a really great flavor.


I have not had much success with browning butter in the past because I'm always so worried that it's going to burn that I take it off the stove before it actually browns. But I was determined this time to get it right- this little tutorial on All Recipes helped me quite a bit. I strained the butter through a sieve like the directions indicated and I think I ended up straining out most of the salt that was in the butter- so that it was too salty or too sweet.


Caramel Cake Recipe Courtesy of Shuna Fish Lydon
Recipe published from Bay Area Bites


Hosts/Co-Hosts for this month's challenge:
Natalie of Gluten-a-Go-Go


CARAMEL CAKE WITH CARAMELIZED BUTTER FROSTING

10 Tablespoons unsalted butter at room temperature
1 1/4 Cups granulated sugar
1/2 teaspoon kosher salt
1/3 Cup Caramel Syrup (see recipe below)
2 eggs, at room temperature
splash vanilla extract
2 Cups all-purpose flour
1/2 teaspoon baking powder
1 cup milk, at room temperature


Preheat oven to 350F
Butter one tall (2 – 2.5 inch deep) 9-inch cake pan.
In the bowl of a stand mixer fitted with a paddle attachment, cream butter until smooth. Add sugar and salt & cream until light and fluffy.
Slowly pour room temperature caramel syrup into bowl. Scrape down bowl and increase speed. Add eggs/vanilla extract a little at a time, mixing well after each addition. Scrape down bowl again, beat mixture until light and uniform.
Sift flour and baking powder. Turn mixer to lowest speed, and add one third of the dry ingredients. When incorporated, add half of the milk, a little at a time. Add another third of the dry ingredients, then the other half of the milk and finish with the dry ingredients.
Take off mixer and by hand, use a spatula to do a few last folds, making sure batter is uniform. Turn batter into prepared cake pan.Place cake pan on cookie sheet or 1/2 sheet pan. Set first timer for 30 minutes, rotate pan and set timer for another 15-20 minutes. Your own oven will set the pace. Bake until sides pull away from the pan and skewer inserted in middle comes out clean. Cool cake completely before icing it.
Cake will keep for three days outside of the refrigerator.


CARAMEL SYRUP
2 cups sugar
1/2 cup water
1 cup water (for "stopping" the caramelization process)
In a small stainless steel saucepan, with tall sides, mix water and sugar until mixture feels like wet sand. Brush down any stray sugar crystals with wet pastry brush. Turn on heat to highest flame. Cook until smoking slightly: dark amber.
When color is achieved, very carefully pour in one cup of water. Caramel will jump and sputter about! It is very dangerous, so have long sleeves on and be prepared to step back.Whisk over medium heat until it has reduced slightly and feels sticky between two fingers. {Obviously wait for it to cool on a spoon before touching it.}
Note: For safety reasons, have ready a bowl of ice water to plunge your hands into if any caramel should land on your skin.


CARAMELIZED BUTTER FROSTING
12 tablespoons unsalted butter
1 pound confectioner’s sugar, sifted
4-6 tablespoons heavy cream
2 teaspoons vanilla extract
2-4 tablespoons caramel syrup
Kosher or sea salt to taste
Cook butter until brown.
Pour through a fine meshed sieve into a heatproof bowl, set aside to cool. Pour cooled brown butter into mixer bowl.
In a stand mixer fitted with a paddle or whisk attachment, add confectioner's sugar a little at a time. When mixture looks too chunky to take any more, add a bit of cream and or caramel syrup. Repeat until mixture looks smooth and all confectioner's sugar has been incorporated. Add salt to taste.
Note: Caramelized butter frosting will keep in fridge for up to a month. To smooth out from cold, microwave a bit, then mix with paddle attachment until smooth and light
(recipes above courtesy of Shuna Fish Lydon)


10/7/08

TWD: Caramel Peanut- Topped Brownie Cake


YAY! This is my first Tuesdays with Dorie post! I have been wanting to join this group of bakers for awhile- I always get really excited on Tuesdays because they all post such beautiful pictures of their weekly bake from Baking from My Home to Yours by Dorie Greenspan. Well last week I went out to Barnes and Noble and (using my husband's gift card which he received for his birthday-bad wife!) purchased my very own copy of the exquisite and very heavy cookbook.


This week's recipe was selected by Tammy of Wee Treats by Tammy and you can find the recipe for Caramel Peanut-Topped Brownie Cake on her blog. I, like so many other TWD bakers, was pretty nervous when I saw that this week's recipe involved homemade caramel as the star component of the cake. I watched my mom make caramel once for a caramel pie and I all that I remember is that it involved a water bath, a candy thermometer, and a lot of sweating. Well, I am happy to report that this was nothing like that!


The cake was very easy and straightforward to throw together. It really tastes and feels like a brownie- it is a little drier though- but I feel like that is on purpose so that it can support the weight of all of those peanuts covered in caramel (it also soaks up a bit of the hot caramel- heaven!).
Here's the big surprise- the caramel part was easy too! Now I'll be honest- I watched the sugar like HAWK! I never left the stovetop. And it took about 27 minutes (not 5-10 as Dorie suggests) to turn to the desired deep amber color.


I was so pleased with the flavor, texture, and lovely color! The cake got rave reviews from everyone who tasted it- I will definitely be making this again- it would be great to serve for dessert at a dinner party.